Training Grounds: Vol. 2
- Alexander

- Aug 26
- 7 min read

Welcome back to Training Ground, the segment where I wax poetic about my preparations for competitive play! Last time I went over the first draft of my tournament list and explained how it didn’t do particularly well in my first couple test games, so I decided to make some substantial changes to my army list. Thankfully I was able to get three games under my belt in quick succession against two wonderful generals who will also be attending the tournament in order to test out the new version.
First of all, here’s the new list:
Characters
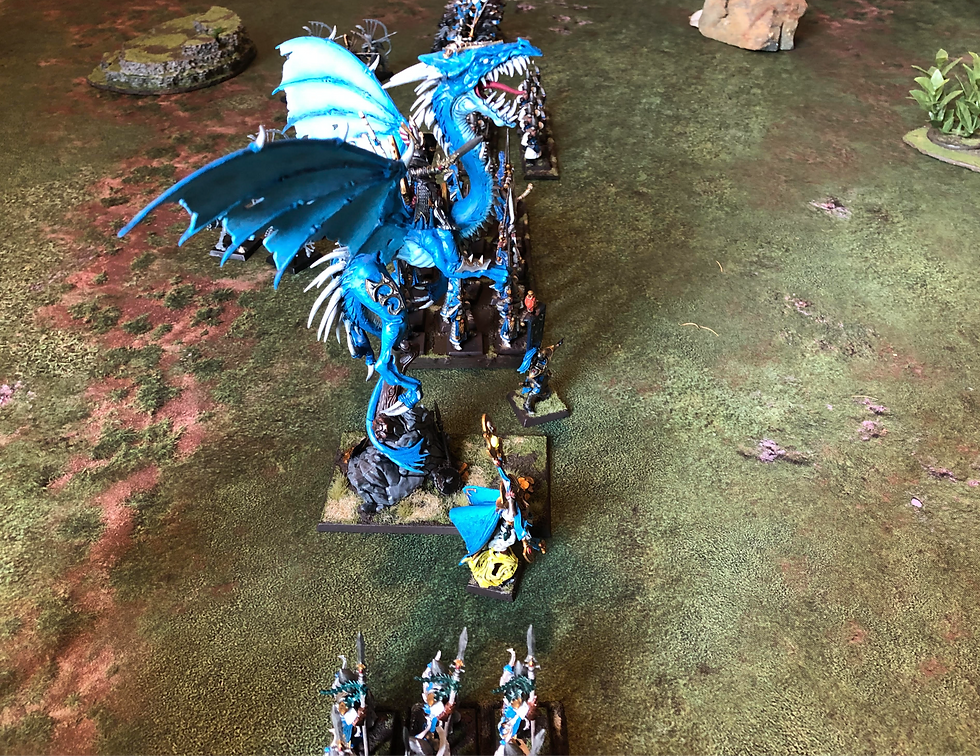
-Prince on Moon Dragon 480 (general)
Blood of Caledor, Full plate, charmed shield, ogre blade, opal amulet
-Noble on Griffon 260
Full plate, great weapon, enchanted shield, opal amulet, seed of rebirth
-Noble 251
BSB (banner of resilience), Loremaster (takes glittering robe from illusion), full plate, dragon helm, sword of hoeth, earthing rod, seed of rebirth
Core
-6 silver Helms 150
High helm, shields
-15 spearmen 160
Full command, shield wall
-5 Ellyrian reavers 90
Shortbows + cavalry spears
-5 Archers 50
-5 Archers 50
Special
-20 swordmasters 343
Full command, war banner, drilled
-5 shadow warriors 75
Ambushers
Rare
-Lothern skycutter 90
My thinking in making these changes, was that the archmage really wasn’t pulling his weight and, with his spells being so unreliable, I opted to drop him, relying on the loremaster to dispel enemy magic instead. I also went for a more lean core and dropped a lot of the ranged threat in favour of a much more aggressive playstyle, as I was finding that my shooting units gave away more points than they earned most of the time. In the new and improved list, the game plan is to use the griffon noble in concert with the prince on his moon dragon. Both heroes pack a serious punch, and the noble can take challenges and maximize overkill seeing as he’ll swing with his great weapon at the same time as his mount, so only his stomp attacks will be wasted.
Ok, so how did my first few games go?
Game 1: Versus Bretonnians

This game we played domination. Leading the Bretonians was the classic virtue of heroism general on royal pegasus, and following him into the fray, were some questing knights with great weapons, some mounted yeomen, some knight errants, some grail knights, a brick of foot knights with a damsel and a BSB, a trebuchet, some mounted yeoman, a block of archers and a block of men at arms.
Deployment was fairly standard. I opted to ambush with my shadow warriors, and we both deployed wide (partly because we were playing the table quarters scenario). My plan was to take on the more dangerous enemy units like the grail knights with the swordmasters backed up by the spearmen while the monsters went for the softer peasant units on the flank since I knew the grail knights could challenge my prince ad nauseam.

In the early game we both played conservatively, apart from one bombastic round one combat between the mounted yeoman and the reavers that had us both laughing out loud, where both units were struck by the trebuchet and nearly wiped out, and the two remaining reavers just barely managed to win out over their Bretonnian counterparts. Over the next couple turns, my dragon caused the peasant bowmen to flee off the table, my silverhelms charged the men-at-arms and pushed them back with the help of First Charge. Meanwhile the noble on griffon who had gone into the knights errant to the left of the men-at-arms, whiffed spectacularly, and fled. While this was bad luck for me though, it may have saved my dragon as the resulting flee ended up putting my noble between the Bretonian general and my dragon.
The counterattack was fierce, with the grail knights, the foot knights, and the knights errant charging my swordmasters and my spearmen, resulting in a sprawling combat involving all five units, while the Bretonian general cut down several silver helms, pushing them back and some knights flank charged my dragon to tie it up. This could have been a devastating turn for me, but as the fates would have it, in the swirling melee the grail knights failed to inflict much damage and the swordmasters struck back and slew enough knights to win the combat handily. Meanwhile the silver helms took a few casualties and fell back in good order, but lived to fight another day.
In the following turns my noble managed to reclaim his honour by fighting the Bretonian general to a standstill and wounded him, my ambushing shadow warriors combined with the skycutter managed to destroy the trebuchet, and my swordmasters eliminated the grail knights. This proved decisive as it set the skycutter up to kill the Bretonnian general with its impact hits in the following turn, more or less ending the battle there. High Elf Victory!
Game 2: Versus Empire

This game we opted to play with strategic locations. My opponent brought two great cannons back up by an engineer, a steam tank, a large unit of knights, a big brick of halberds with a BSB, a general on an imperial griffon, some demigryph knights, some outriders, and a couple units of archers to screen.
Once again deployment was rather standard, apart from my decision to place both my monsters out in the open, risking being hit with cannon shot in order to charge them as early as possible. Again I went first, and in the early turns of the game I was able to start wracking up scenario points by controlling the forward objectives with my cavalry and the rearmost with my spearmen while my opponent only controlled his own backfield objective. Meanwhile our big threats missed each other, with my dragon swooping and devouring the cannons and their crew early on and the imperial griffon and the steam tank barrelling forward to destroy my silver helms, and eventually, my spearmen.
This was a slightly more cagey game than the last, with both of us being wary of the other’s threat ranges and playing for objective points. While I was able to destroy the halberdier block with my dragon and chase off the artillery, I took heavy casualties of my own. While the scenario points did pull me slightly ahead of my opponent at the end of the game, under the matched play guide’s rules you need at least 300 victory points more than your opponent to secure a win, so this game was a draw, and a thoroughly enjoyable slug-fest at that too.
Game 3: Versus Empire (again)
We ended up with extra time and table space so my previous opponent and I decided to play another game using the domination objectives, though he made a few changes to his list for variety. This time he swapped out his griffin-mounted general for an arch lector on a war altar, took more knights over the outriders, dropped the BSB for a witch hunter, and took an organ gun.
In this game we also chose to use the flank attack deployment, which allowed me to send my two heroes unopposed down the right flank. Both of us played quite aggressively this game. I learned from last game that the steam tank had to be destroyed and the only way I was going to achieve that was with my two monstrous heroes, so I sent them straight for it, meanwhile his knights and his arch-lector crashed into my swordmasters early on, and the silver helms clashed with the demigryph knights.

While I think my odds were improved by my more aggressive plays with the dragon this game, I was also granted more than my fair share of luck, tilting the odds in my favour. First of all, the arch lector failed to kill my BSB in a challenge when by rights he likely should have, secondly, my silver helms managed to fight the demigryph knight to a standstill for several turns, keeping the monstrous cavalry out of the fight for much longer than they should have, and lastly, my prince on the dragon rolled quite well with his ogre blade and was able to destroy the steam tank in just two rounds, allowing him to turn his attention to the enemy general—and it didn’t help that my opponent seemed to fail every terror check he had to make, despite having high leadership. Ultimately this game proved to be a bloodbath, and despite losing the griffon noble to a lucky ruby ring of ruin roll from the engineer in the last turn of the game, the High Elves were victorious, mostly due to the tremendous damage output of the dragon.
In Conclusion
By the end of the three games I played, I was quite happy with the second draft of my army list, and I ended up submitting my roster as it appears here. Mainly, I realized that with High Elves you have to commit to the alpha strike and play aggressively, and that anything more than a level 1 wizard is likely not worth it when you compare the cost with our excellent combat heroes. Before I was playing too defensively and allowing my elite units to get picked off, but the new list leans into the strengths of High Elves and does a better job of picking its own fights. Along these lines, I also think the hero loadouts worked significantly better than before. While in theory a second opal amulet makes the dragon harder to kill, I’ve realized that not only does the ogre blade change the prince into a threat that is actually worthy of its price tag, but it acts as its own sort of defensive ward, in that the prince has always strikes first, and with such a deadly sword some heroes will be wary of charging him, even if they do have monster slayer.
Meanwhile, my core gives me three units that can hold strategic locations, the cavalry worked well as flank–chargers, the archers as redirectors, and the best part was that none of these units gave away a significant sum of points if they died. I found that the previous draft of the list was a bit all over the place in that some units wanted to advance and some units wanted to hang back, but with this draft I found that everything could push forward, allowing each unit to mutually support one another, and I was able to set up way more multi-charges and favourable combats than ever before. Overall, I ended the day feeling much more confident going into the tournament. It may not be the double-star dragon meta list, but I’m sure that my army will be able to compete.